
Since TCN provides you with tips and articles to post on your blog, you need a way to move the text and graphics over to your site. You can always go to each article (linked on your Posts page), copy the text and drag the graphics to your Desktop to download them. Then you can switch over to your blog, paste the text in, reformat it as necessary, and insert the graphics. Nothing wrong with copy and paste, and working with the text a bit more in this way might make it easier to personalize each article.
For WordPress users, the easiest way to bring TCN content to your site is with the CyberSEO Pro plug-in. It was originally called CyberSyn and then renamed to CyberSEO Lite. More recently, the company behind it has stopped development on the free CyberSEO Lite. Although current installations will likely keep working for some time, new users must purchase CyberSEO Pro ($29.95 for a year of updates) instead. It would also make sense to upgrade from CyberSEO Lite at some point, since unsupported WordPress plug-ins can open security vulnerabilities.
Here’s how to configure CyberSEO Pro, and once it’s running, every new TCN post automatically appears in your blog as a draft post, ready for editing and posting. Follow these steps:
THESE INSTRUCTIONS STILL BEING UPDATED FROM CYBERSEO LITE TO CYBERSEO PRO.
- First, verify that your WordPress installation is compatible with CyberSEO Pro. If it is, buy a 1-site license for CyberSEO Pro. Follow CyberSEO’s installation instructions.
- A new CyberSEO Pro item appears in your Dashboard’s navigation sidebar. Click it, and then General Settings underneath it, to load CyberSEO Lite’s General Settings page.
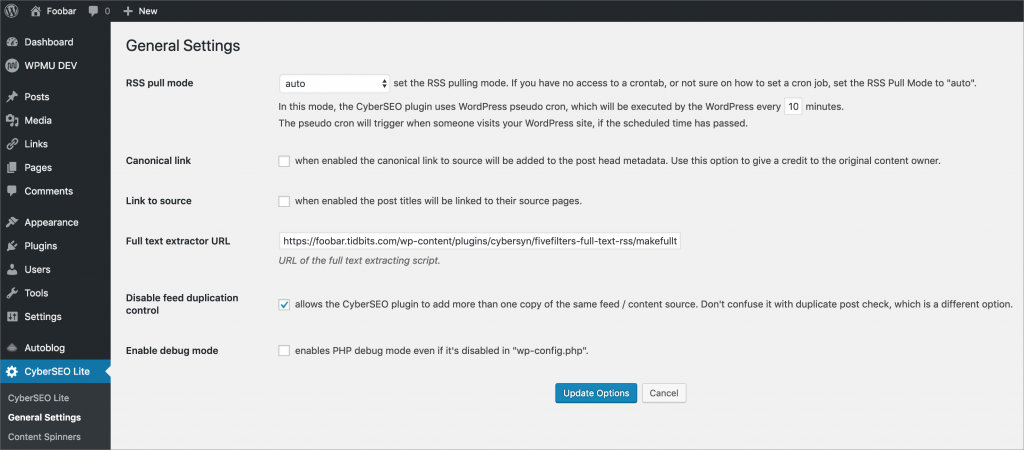
- Set the RSS pull mode to auto, make sure Link to source is unchecked, leave the Full text extractor URL field blank (CyberSEO Lite fills it in automatically), and for now, select Disable feed duplicate control while you’re testing (you can turn it off later if you wish). Click Update Options when you’re done.
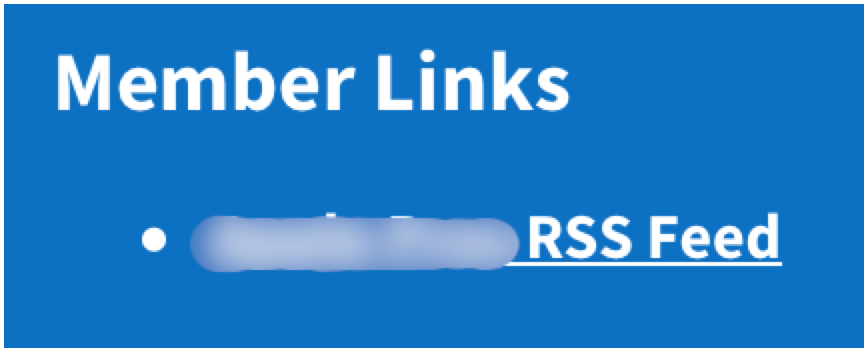
- Open a new browser tab and go to your TCN Account page. At the bottom of that page, in the Member Links section, Control-click the RSS Feed and choose Copy Link, Copy Link Location, Copy Link Address, or whatever your browser calls it.
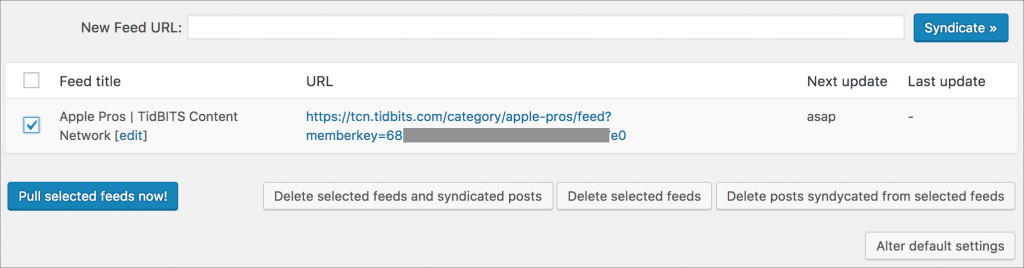
- Now that you have your RSS feed’s URL in the clipboard, go back to the tab for your WordPress site and click CyberSEO Lite in the CyberSEO Lite sidebar menu. Paste your URL (it should look like the one below, but with your memberkey) into the New Feed URL field and click the blue Syndicate button.

- On the Feed Info and Preview page, you should see the full text of the first post, along with the featured image for that post. If you don’t, or there’s an error about content being restricted, you probably have the wrong URL. Scroll down to the settings. I’ve highlighted the important ones below.

- First, although it’s not highlighted, do not select Extract full articles. It’s off by default and needs to stay off.
- For Syndicate this feed to the following categories select whatever local categories you want to associate with incoming posts. It would be a good idea to give them all a unique category, should you wish to work with them as a group later on.
- For Undefined categories choose Post to default WordPress category. Otherwise, CyberSEO Lite creates new categories for you, which might not be ideal.
- For Maximum number of posts to be syndicated from each feed at once enter 10. In most months, we publish eight new posts, but some months have more when there are bonus news articles. Even if this number were lower, CyberSEO Lite should still get everything, but it might take a few passes.
- For Posts status, choose Save as draft. This one is important, since it gives you the opportunity to edit each article, schedule them however you see fit, and remove the Facebook and Twitter teasers from the bottom.
- For Posts thumbnail, choose Generate from media attachment thumbnail so you get the featured image correctly.
- Finally, for Store images locally, select the checkbox so images are copied from your site and not merely linked to on the TCN site, which might cause them to disappear from your posts in the future.
- For all the other settings on this page, leave them at their defaults for now—you can always tweak things later.
- At the bottom of the page (not shown in the screenshot above), click Syndicate This Feed.
- You’re taken back to the main RSS/Atom Syndicator page. Select the checkbox next to your feed, and click the Pull Selected Feeds Now button.
- CyberSEO Lite goes out and retrieves the content for your feed. Click Posts in the WordPress sidebar to see all your draft posts, and click one to make sure all the text and images are present and in the right places.
That may seem a little involved, but you have to do it only once. From now on, CyberSEO Lite will automatically retrieve new posts added to your custom TCN RSS feed and turn them into drafts in your WordPress site.
Note that CyberSEO Lite stores featured images in your Media Library, but does not put other images from posts there. It is storing the files locally, but only in your /wp-content/uploads directory.
I presume you know how to make a draft post public, but just as a reminder, you’ll want to cut out the Facebook and Twitter teasers at the bottom of an article before posting. Then, after you’ve posted, you can use those teasers with the link to the article on your site, to promote it on social media.
If anything isn’t clear in the instructions above, or if you have troubles, let me know, and I’ll see what I can do to help.